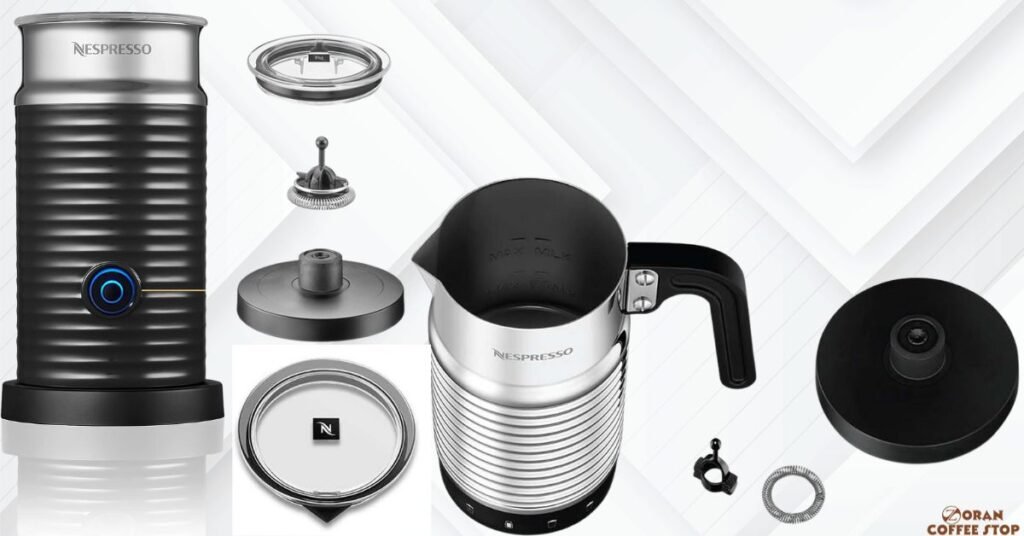
A Nespresso frother is a small kitchen appliance that heats and froths milk for use in coffee drinks such as cappuccinos and lattes. When a Nespresso frother blinks red, it indicates that there is a problem with the appliance.
Nespresso Frother Blinking Red light can be caused by a variety of factors, including overheating, milk residue, a damaged or unattached whisk, an incorrectly inserted jug, electrical problems, not connecting properly, not cleaning well enough, whisk position, milk quantity, and other related problems.
We will explain each problem and give you solutions, so you can fix it easily. Stay tuned for our detailed content that will help you understand and solve these problems effectively.
How to Use Nespresso Frother
The Aeroccino 3 is the older model and has a more basic design. It has a single button that controls all preparations, and it can make hot milk, hot milk foam, and cold milk froth. The Nespresso Aeroccino 3 frother has a single button that controls all preparations. To make hot milk or hot milk foam, press the button once for one second. To make cold milk froth, press the button for two seconds.
The Aeroccino 4 is the newer model and has a more modern design. It has three buttons, one for each preparation: hot milk, hot milk foam, and cold milk froth. It also has a built-in thermostat that regulates the temperature of the milk, ensuring that it is heated to the perfect temperature for frothing.
To use the Nespresso Aeroccino 4 frother, simply pour milk into the jug up to the fill line and select the desired setting from hot froth, cold froth, or hot milk. Then, press the button and the frother will do the rest.
How Does Nespresso Frother Works
The Nespresso Aeroccino frother works using a combination of induction heating and a rotating whisk to froth milk. The induction heating heats the milk from the bottom of the jug, while the whisk creates air bubbles in the milk. The combination of heat and air bubbles causes the milk to foam up.
The Nespresso Aeroccino frother has a non-stick coating, so it is easy to clean. Simply rinse the jug with water after each use and wipe it dry with a towel.

To Use a Nespresso Frother, Follow These Steps
- Pour milk into the jug up to the fill line.
- Select the desired setting: hot milk, hot milk foam, or cold milk froth.
- Press the button to start the frothing process.
- Wait for the frother to finish frothing the milk.
Tips for Using the Nespresso Aeroccino Frother
- Use whole milk for the best results. Skim milk and low-fat milk will not produce as much foam.
- Fill the jug to the fill line, but do not overfill it.
- Do not use the frother with frozen milk.
- Clean the frother after each use.
Once the milk is frothed, you can add it to your coffee to make a cappuccino, latte, or other coffee drink. You can also use the frothed milk to make hot chocolate or other milk-based drinks.
Nespresso Frother Blinking Red – Problems & Solutions
If your Aeroccino’s red light continuously flashes and the heating cycle stops prematurely, it indicates that the device has detected rapid heating. This can be caused by various factors. Let’s understand these potential elements and provide steps to effectively address the issue.
Dirty or Unstable Connection
A dirty or unstable connection can cause a variety of problems with electronic devices, including the Nespresso Aeroccino. If the red light on your Aeroccino is flashing, it’s possible that the connection between the base and the jug is not secure. To address the issue of a dirty or unstable connection, follow these steps;
| Steps | Actions |
|---|---|
| 1) | Ensure that the whisk is properly attached to the jug, providing a stable connection for effective frothing. |
| 2) | Place the jug securely onto the base, which supplies power to the frother. This helps establish a stable and reliable connection. |
| 3) | Examine the connectors at the bottom of the jug and the top of the base. If there is any dirt or residue, clean them using a damp cloth or a gentle sponge. |
| 4) | If there is crusted residue on the base due to previous milk overflow, thoroughly clean the base. Use a toothbrush or gentle sponge for more stubborn residue, if needed. |
| 5) | After cleaning, ensure that both the base and the jug are completely dry before using the frother again. This helps maintain a stable and reliable connection. |
Additionally, check the power source and ensure the frother is securely plugged into a functioning outlet. If the issue persists, try resetting the frother by unplugging it for a few seconds and then plugging it back in. Inspect the power cable and components for any damage or wear, as these can cause an unstable connection.
Nespresso Frother Milk Level Issue
The Nespresso frother has a built-in sensor that detects the milk level. If the milk level is too high or too low, the frother may blink red and stop heating. Always adjust the milk level to the fill line on the jug. If you are using cold milk, you may need to add a little bit more milk than if you are using hot milk.
| Steps | Actions |
|---|---|
| 1) | Ensure that you add the right amount of milk to the frother. Adding less than 4 ounces of milk can lead to a malfunction due to insufficient liquid. |
| 2) | For frothy milk and lattes, set the frother to a lower MAX level. Increase it to a higher MAX level when frothing milk for coffee. Going beyond these limits can result in improper heating and cause the frother’s blinking red lights. |
| 3) | Fill the frother to the appropriate lines based on the presence or absence of the coil on the whisk. If the coil is present, fill it to the bottom line. Without the coil, you can choose to fill to either the bottom or top line. |
| 4) | For optimal results, use cold whole or reduced-fat milk. Non-dairy “barista” alternatives like oat and almond milk should work well, but some non-dairy options may not froth effectively. |
| 5) | If you are still having problems, try cleaning the milk sensor. The milk sensor is located at the bottom of the jug. You can clean it with a damp cloth or a cotton swab. |
Moreover, Pour the milk slowly to maintain a steady level, as pouring too quickly can cause fluctuations. opt for fresh milk, as older or close-to-expiration milk may not froth well. Preheat the jug before frothing to maintain a consistent milk temperature and prevent milk level problems.

Neglected Maintenance of Aeroccino Jug and Whisk
The milk holes in the Aeroccino jug are responsible for creating the froth. If the milk holes are clogged, the frother will not be able to produce as much foam. Neglected maintenance of the Aeroccino jug and whisk can lead to several issues with your Nespresso milk frother.
Over time, milk residue can build up on these components, affecting the frother performance and causing the blinking red light. To prevent this, here are some basic steps to follow;
| Steps | Actions |
|---|---|
| 1) | Use a non-stick scourer or scrubbing sponge with cold water to clean the jug after each use. Avoid using abrasive cleaners or scouring pads that can damage the surface of the jug. |
| 2) | Avoid abrasive cleaners or scouring pads that can damage the jug’s surface. |
| 3) | For stubborn residue, soak the jug and whisk in a mixture of water and dish soap, then scrub gently. Rinse them well to remove soap residue. |
| 4) | If there are hard-to-remove milk deposits, try soaking in a solution of equal parts water and white vinegar for a few hours or overnight. Rinse thoroughly. |
| 5) | Some models, like the Aeroccino 3, are not dishwasher safe; always wash by hand. |
| 6) | Use a compatible milk frother descaling solution to remove mineral deposits inside the Aeroccino jug. |
| 7) | Occasionally, perform a deep cleaning by soaking the jug and whisk in a mixture of warm water and mild detergent to remove stubborn residue. |
Some Other Helpful Tips
Create a paste using baking soda and water, and use it to scrub away tough stains and odors. Rinse the jug thoroughly after cleaning. Another option is to mix lemon juice with water and apply it to dissolve milk residue and leave a fresh scent. Let the solution sit for 15-30 minutes before rinsing well.
When cleaning the silicone whisk, wash it separately using warm soapy water and a gentle brush, ensuring it is completely rinsed and dried before reattaching. Avoid submerging the base in water and instead wipe it clean with a damp cloth. Always, store the jug and whisk in a clean, dry place to protect them from potential damage or contamination.
Defective or Missing Whisk
When dealing with a damaged or missing whisk in your Aeroccino milk frother, it can lead to issues with its functionality. A damaged whisk may result in improper frothing or cause the machine to malfunction.
Similarly, if the whisk is missing, the frother will not be able to perform its intended function. A damaged Nespresso whisk can result from various causes.
One possibility is wear and tear from regular use. Over time, the constant spinning and agitation can cause the whisk’s metal wires to weaken or bend, compromising its effectiveness.

| Steps | Actions |
|---|---|
| 1) | Inspect the whisk for signs of damage, like cracks or breakage. If the whisk is bent, cracked, or chipped, it will need to be replaced. |
| 2) | Ensure the whisk is securely attached and correctly positioned in the frother for effective frothing. It should fit snugly and be aligned correctly for effective frothing. |
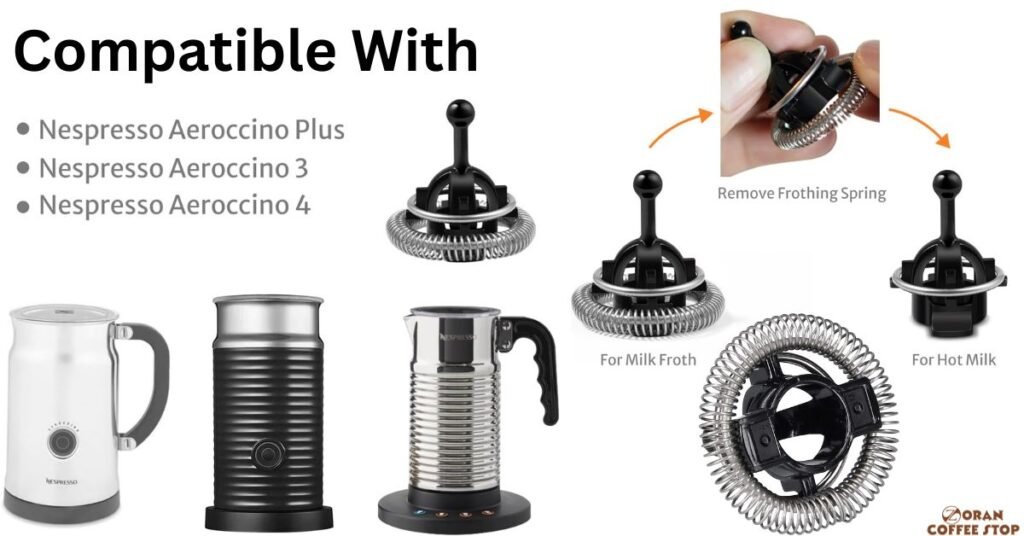
| 3) | If the whisk is missing, contact Nespresso customer support or visit an authorized retailer to obtain a model-specific replacement. You can buy whisk on amazon also. If you want less foam use this STEAMING WHISK |
| 4) | If a replacement whisk is unavailable, consider using handheld frothers or manual whisks as temporary alternatives. |
| 5) | If you have another Aeroccino frother, try using the whisk from that frother. This will help you to determine if the whisk is the problem. For next time consider purchasing an extra whisk as a backup in case of future damage or loss. |
| 6) | Do not use the Aeroccino milk frother without a whisk or with a damaged whisk, as it may lead to suboptimal frothing or malfunctions. |
Different models of Aeroccino frothers use different whisks, so it is important to select the correct model for your frother. You can find the correct whisk model for your frother in the product manual or on the Nespresso website.
Repeated Usage of the Aeroccino
Repeated back-to-back uses of the Aeroccino milk frother without allowing sufficient cooling time can lead to overheating issues. The frother is equipped with an internal thermostat that automatically shuts off the machine when the temperature reaches a certain threshold to prevent damage or safety hazards. To resolve this problem and prevent overheating;
| Steps | Actions |
|---|---|
| 1) | After each use, give the Aeroccino a minimum of 15-20 minutes to cool down before using it again. This allows the internal components to return to a safe operating temperature. |
| 2) | If you need to use the frother immediately, rinse the jug and lid with cold water to help dissipate heat. However, ensure that no water comes into contact with the electrical contacts on the base to avoid any potential damage. |
| 3) | It’s important not to rush the process and give the machine ample time to cool down naturally. Trying to use the frother back-to-back without proper cooling time can increase the risk of overheating and trigger safety mechanisms. |
Avoid overloaded outlets or extension cords, as this can cause the frother to overheat. Be attentive to any unusual noises, excessive vibration, or a significant increase in temperature. If any of these signs occur, stop using the frother immediately and allow it to cool down.
Defective Thermocouple
A defective thermocouple can prevent the Nespresso Aeroccino from heating properly. The thermocouple is a sensor that measures the temperature of the milk. If the thermocouple is defective, it may send an incorrect signal to the frother, which can cause the frother to overheat or not heat up at all. This incorrect temperature reading may trigger the red light warning on the frother.
| Steps | Actions |
|---|---|
| 1) | First try to clean the thermocouple it is located at the bottom of the jug. You can clean it with a damp cloth or a cotton swab. |
| 2) | If your machine consistently shows the red light warning and malfunctions, it may be a thermocouple issue. Inspect for visible damage or wear on the thermocouple. Replace it if you find it damaged. |
| 3) | During the replacement process, make sure to correctly position and align the new thermocouple. It should be placed at an appropriate distance from the heat source to prevent future damage and provide accurate temperature readings. |
| 4) | In some cases, the thermocouple may be functioning properly, but its calibration might be off. This can result in inaccurate temperature readings. |
| 5) | If the red light warning persists even after thermocouple replacement, it may indicate a more complex issue. Contact Nespresso customer support or a qualified technician for diagnosis and resolution. |
Avoid exposing the thermocouple to liquids. Liquids can damage the thermocouple and cause it to malfunction. Avoid DIY repairs or modifications, If you are not comfortable troubleshooting or repairing the thermocouple yourself, contact Nespresso customer support or an authorized service center for assistance. Incorrect repairs or modifications can damage the machine and void your warranty.
You may find these guides also helpful;
- Why Is My Nespresso Blinking Orange – 9 Reasons
- Solve Blinking Red Light Issue on Your Nespresso Vertuo
- How to Exit Descaling Mode Nespresso – Quick Steps to Solve
Low Voltage or Weak Power Supply
Electrical connection issues can cause a variety of problems with Nespresso coffee makers and frothers, including the red light blinking. To troubleshoot electrical connection issues, follow these steps:
| Steps | Actions |
|---|---|
| 1) | Make sure that the power cord is properly inserted into both the frother and the outlet. Also, inspect the power cord for any signs of damage, such as fraying, cuts, or kinks. If the power cord is damaged, it should be replaced immediately. |
| 2) | Verify the outlet’s functionality by plugging in another device. If it doesn’t work, try a different outlet. |
| 3) | If you have another power cord that fits the frother, try using it. If the frother works with the different power cord, then the problem is likely with the original power cord. |
Avoid using extension cords with the frother. Extension cords can reduce the voltage and power supply to the frother, which can cause it to malfunction. If you are using a power strip, make sure that the power strip is rated for the power requirements of the frother. If the frother is plugged into a surge protector, make sure that the surge protector is turned on and that it is not overloaded.
In rare cases, the blinking red light may be caused by a software glitch. If you have tried all of the above and the frother is still not working, try resetting the frother.
For More Information download user manual by clicking here
Conclusion
In conclusion, the proper care and maintenance of your Aeroccino milk frother are crucial for its optimal performance. Regular cleaning, descaling, and ensuring the compatibility of replacement parts, such as the whisk and thermocouple, are essential steps to keep your frother in good condition.
By following the recommended cleaning methods, like using baking soda or lemon juice solutions, you can effectively remove stains and odors. Paying attention to the fill levels, avoiding overheating, and properly storing the frother also contribute to its longevity. By taking these measures and seeking additional support if necessary, you can ensure a smooth and enjoyable frothing experience with your Aeroccino milk frother.
How do I reset my Nespresso milk frother?
To reset your Nespresso milk frother, Make sure that the frother is turned off and unplugged from the outlet. Now Press and hold the two arrow buttons for 3 seconds. The red light will blink rapidly. Press the center button to confirm the reset. The red light will turn off. The frother is now reset. You can plug it back in and start using it again.
Why are all the buttons blinking on my Nespresso milk frother?
If the four buttons on your Nespresso Aeroccino frother are blinking fast, it means that the frother has detected an error. There are a few things that you can do to try to fix this error; Check the whisk is it properly inserted into the jug and that it is not damaged, Clean the Aeroccino thoroughly with water and a mild dish soap. Additionally, Check the base of the Aeroccino is it dry wetness can also cause blinking.
Why does my Nespresso frother stop after a few seconds?
If your Nespresso frother stops after a few seconds, it may be overheating. To prevent this, allow it to cool down, clean it regularly, and avoid overfilling the jug. Additionally, you may need to reprogram the frother to run for a longer duration. To do this, simply hold down the button for the desired amount of time. The frother will remember this setting for future use.
Why is my milk frother not working?
If your milk frother is not working properly, there are a few things you can check. First, make sure that the frother is plugged into a working outlet. Next, check the whisk to make sure it is properly inserted and aligned. A defective thermocouple can prevent the frother from heating the milk properly, so it is important to make sure that it is functioning correctly.
To avoid overheating, allow the frother to cool down between uses. Additionally, maintain the milk level within the recommended minimum and maximum fill lines. Finally, ensure that both the jug and the whisk are clean and properly attached, as cleanliness plays a vital role in the frothing process. By addressing these factors, you can potentially resolve the issue with your milk frother.


